Storage Spaces Direct (S2D)の CSV を BitLocker 暗号化について、確認する必要があったので、ここに記録しておきます。
BitLocker and Cluster Shared Volumes in Hyper-V Scenarios
Protecting cluster shared volumes and storage area networks with BitLocker
を参考します。
だた、上記のドキュメントは、一部違いがあります。
BitLocker and Cluster Shared Volumes in Hyper-V Scenarios
では、
Get-ClusterSharedVolume “Name of CSV” | Suspend-ClusterResource
としています。
Protecting cluster shared volumes and storage area networks with BitLocker
では、
Get-ClusterResource "Cluster Disk 1" | Suspend-ClusterResource
となっています。
Windows Server 2019としては、どちらになるかというと、BitLocker and Cluster Shared Volumes in Hyper-V Scenariosのほうです。
確認してみましょう。

CSV こと、クラスター仮想ディスクは、ClusterResource ではなく、ClusterSharedVolume に分類されています。
ということで、BitLocker 暗号化の前に、
Get-ClusterSharedVolume “Name of CSV” | Suspend-ClusterResource
を実行します。
BitLocker 暗号化の後に、
Get-ClusterSharedVolume “Name of CSV” | Resume-ClusterResource
を実行します。
では、
BitLocker 暗号化を有効化するために、S2D の各ノードで、BitLocker をインストールします。
こういうスクリプトで実行させます。有効化が完了したら各ノードを再起動しましょう。
S2D 有効化前であれば、問答無用で再起動します。

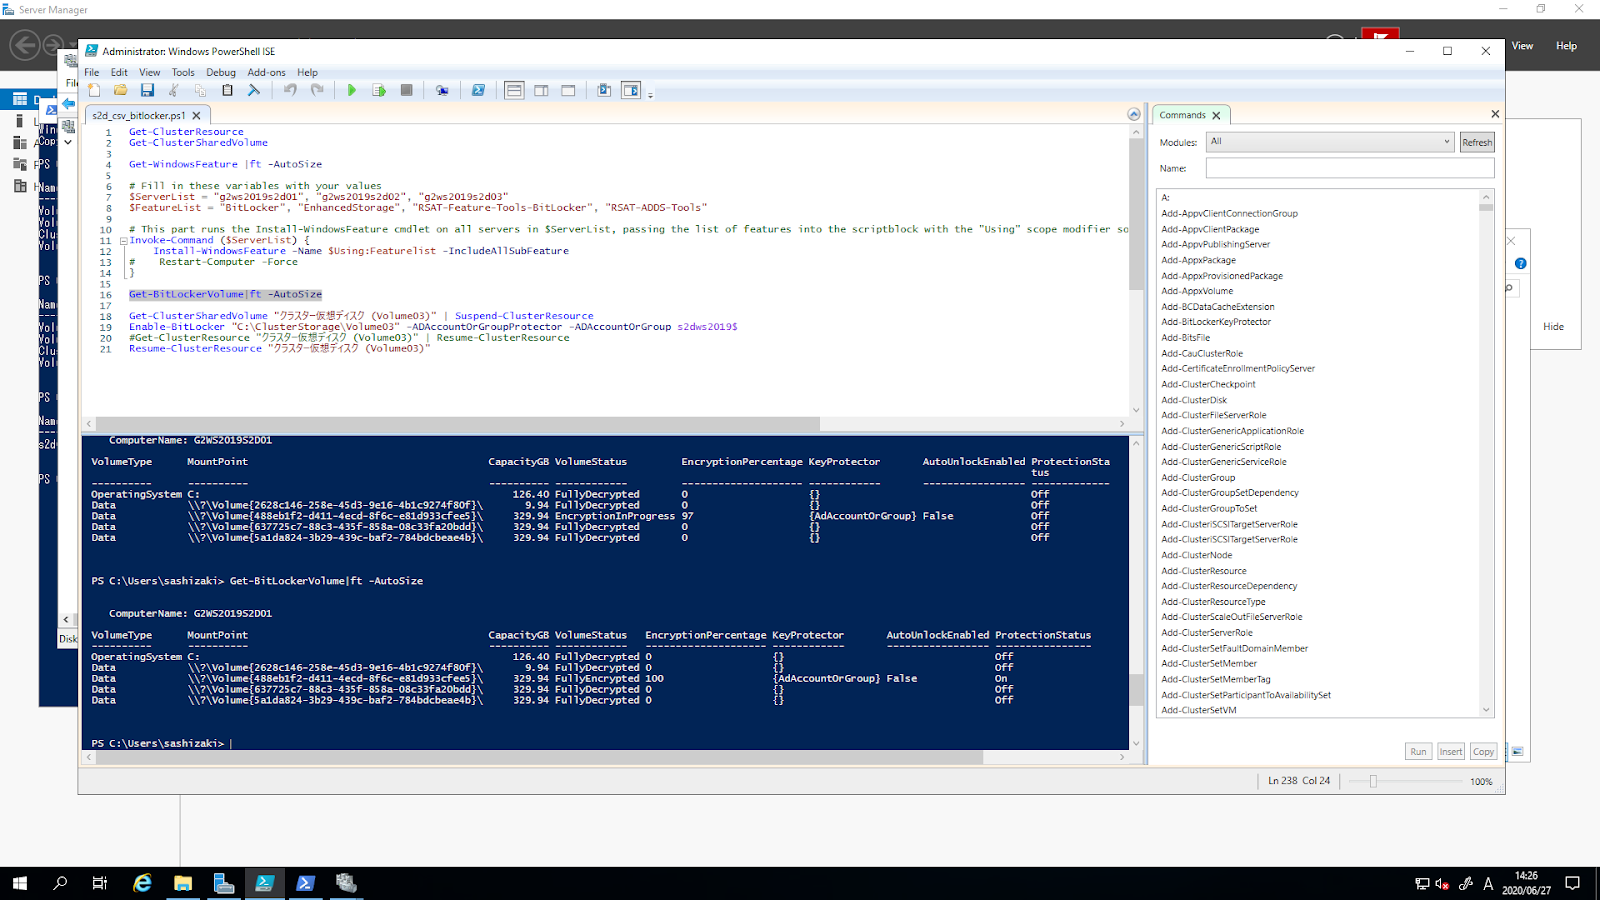
BitLocker がインストールされると、Get-BitLockerVolume を使って各ボリュームの暗号化状況を確認できるようになります。

では、Volume03 を BitLocker 暗号化してみます。
まずは、CSV をサスペンドします。


失敗します。(理由は後述)

いったん、resume するのですが、このコマンドレットではダメで、

Resume-ClusterResource CSVの仮想ディスク名
を実行したほうが良いみたい。

さらに、サスペンドしないとどうなるかということですが、こちらも失敗します。

先ほどの失敗について、種明かしをします。
Volume03 のオーナーシップがありません。

Volume03 のオーナーシップを PowerShell の実行ノードに移動します。

サスペンドからやり直してみます。


サスペンドしても、Volume03 のパスは存在していますね。
CSV のオーナーシップを PowerShell の実行ノードが保有しているかは、必ず確認です。
※要するに、このあたりちゃんと確認しないで、一度検証していたということですw
下記コマンドレットは、クラスターのコンピューターアカウントを指定することで、どのノードからも暗号化された CSV にアクセスできるという寸法のようですね。
Enable-BitLocker "C:\ClusterStorage\Volume03" -ADAccountOrGroupProtector -ADAccountOrGroup s2dws2019$
有効化しました。正確には、暗号化が開始されました。進行状況は、
Get-BitLockerVolume|ft -AutoSize
で確認できます。

今回の環境は、RAID5な SSD 上に構築した Nested S2D クラスターで、3 way Mirror な330GB のCSVを暗号化しました。
で、所要時間としては、30分弱でした。暗号化に要する時間は、ストレージのスピード、容量によって変わると考えます。

忘れずに、
Resume-ClusterResource "クラスター仮想ディス ク (Volume03)"
します。

暗号化できたので、仮想マシンのストレージ移行(ライブストレージ移行)を行ってみます。
SCVMM 上のジョブ画面でも、エラーなくライブストレージ移行が完了しました。

非暗号化な CSV に戻してみます(ライブストレージ移行)。

問題なく完了。
確認は、以上で終わり。
CSV が Cluster Resource ではなく、Cluster Shared Volume に分類し直されているなど、最近の Windows Server ではマイナーな仕様変更があります。
このあたりを読み替えながら、
BitLocker and Cluster Shared Volumes in Hyper-V Scenarios
Protecting cluster shared volumes and storage area networks with BitLocker
の手順に沿えば、CSV の BitLocker 暗号化は可能です。
BitLocker and Cluster Shared Volumes in Hyper-V Scenarios
Protecting cluster shared volumes and storage area networks with BitLocker
を参考します。
だた、上記のドキュメントは、一部違いがあります。
BitLocker and Cluster Shared Volumes in Hyper-V Scenarios
では、
Get-ClusterSharedVolume “Name of CSV” | Suspend-ClusterResource
としています。
Protecting cluster shared volumes and storage area networks with BitLocker
では、
Get-ClusterResource "Cluster Disk 1" | Suspend-ClusterResource
となっています。
Windows Server 2019としては、どちらになるかというと、BitLocker and Cluster Shared Volumes in Hyper-V Scenariosのほうです。
確認してみましょう。

CSV こと、クラスター仮想ディスクは、ClusterResource ではなく、ClusterSharedVolume に分類されています。
ということで、BitLocker 暗号化の前に、
Get-ClusterSharedVolume “Name of CSV” | Suspend-ClusterResource
を実行します。
BitLocker 暗号化の後に、
Get-ClusterSharedVolume “Name of CSV” | Resume-ClusterResource
を実行します。
では、
BitLocker 暗号化を有効化するために、S2D の各ノードで、BitLocker をインストールします。
こういうスクリプトで実行させます。有効化が完了したら各ノードを再起動しましょう。
Invoke-Command ($ServerList) {※CSVの同期をきちんと取りたいので、再起動はコメントアウトしてますw
Install-WindowsFeature -Name $Using:Featurelist -IncludeAllSubFeature
#Restart-Computer -Force
}
S2D 有効化前であれば、問答無用で再起動します。

BitLocker がインストールされると、Get-BitLockerVolume を使って各ボリュームの暗号化状況を確認できるようになります。

では、Volume03 を BitLocker 暗号化してみます。
まずは、CSV をサスペンドします。


失敗します。(理由は後述)

いったん、resume するのですが、このコマンドレットではダメで、

Resume-ClusterResource CSVの仮想ディスク名
を実行したほうが良いみたい。

さらに、サスペンドしないとどうなるかということですが、こちらも失敗します。

先ほどの失敗について、種明かしをします。
Volume03 のオーナーシップがありません。

Volume03 のオーナーシップを PowerShell の実行ノードに移動します。

サスペンドからやり直してみます。


サスペンドしても、Volume03 のパスは存在していますね。
CSV のオーナーシップを PowerShell の実行ノードが保有しているかは、必ず確認です。
※要するに、このあたりちゃんと確認しないで、一度検証していたということですw
下記コマンドレットは、クラスターのコンピューターアカウントを指定することで、どのノードからも暗号化された CSV にアクセスできるという寸法のようですね。
Enable-BitLocker "C:\ClusterStorage\Volume03" -ADAccountOrGroupProtector -ADAccountOrGroup s2dws2019$
有効化しました。正確には、暗号化が開始されました。進行状況は、
Get-BitLockerVolume|ft -AutoSize
で確認できます。

今回の環境は、RAID5な SSD 上に構築した Nested S2D クラスターで、3 way Mirror な330GB のCSVを暗号化しました。
で、所要時間としては、30分弱でした。暗号化に要する時間は、ストレージのスピード、容量によって変わると考えます。
忘れずに、
Resume-ClusterResource "クラスター仮想ディス ク (Volume03)"
します。

暗号化できたので、仮想マシンのストレージ移行(ライブストレージ移行)を行ってみます。
SCVMM 上のジョブ画面でも、エラーなくライブストレージ移行が完了しました。

非暗号化な CSV に戻してみます(ライブストレージ移行)。

問題なく完了。
確認は、以上で終わり。
CSV が Cluster Resource ではなく、Cluster Shared Volume に分類し直されているなど、最近の Windows Server ではマイナーな仕様変更があります。
このあたりを読み替えながら、
BitLocker and Cluster Shared Volumes in Hyper-V Scenarios
Protecting cluster shared volumes and storage area networks with BitLocker
の手順に沿えば、CSV の BitLocker 暗号化は可能です。
0 件のコメント:
コメントを投稿