今回は、Windows Container ホストの構築を
コンテナー ホストの展開 - Windows Server
Container Host Deployment - Windows Server
のドキュメントから、見ていきます。
手元には、すでにHyper-VホストとなっているWindows Server 2016 TP4のマシン(Nested Hyper-Vを確認した環境)がありますので、これを使います。
ゆくゆくはHyper-Vコンテナも試せればなと。
まず、Windows Container機能をインストールします。
コンテナー ホストの展開 - Windows Server
では、PowerShellになっています。PowerShellのほうが大量展開に有利ですが、GUIでも同様の操作が可能か確認します。
結論として、「Install-WindowsFeature containers」コマンドレットと同じようにできます。


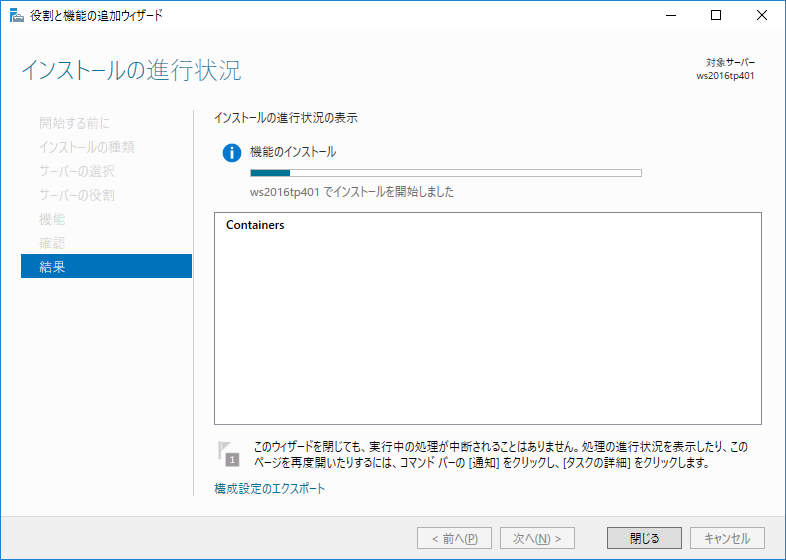
再起動を自動的に行いましたので、

再起動後、ウィザードが完了したことを確認しました。
念のため、「Get-ContainerHost」も実行してみました。

Windows Container ホストとしての準備ができたので、仮想スイッチをNATとして作成を行います。
New-VMSwitch -Name "Virtual Switch" -SwitchType NAT -NATSubnetAddress 192.168.11.0/24
で作成します。

仮想スイッチができたのでNATオブジェクトを作成します。
New-NetNat -Name ContainerNat -InternalIPInterfaceAddressPrefix 192.168.11.0/24

OSイメージをインストールするところにたどり着きました。ですが、その前にContainerProvider PowerShell モジュールをインストールします。
Install-PackageProvider ContainerProvider -Force


Containerイメージを検索してみます。
Find-ContainerImage

Nano Serverと、Windows Server Coreの各OSイメージをインストールしてみます。
Install-ContainerImage -Name NanoServer -Version 10.0.10586.0
BITSでダウンロードするのですね。


なんだかんだ、12分ほどで完了。
Install-ContainerImage -Name WindowsServerCore -Version 10.0.10586.0

さすがにNano Serverとはサイズが違うので、6分経過後でもダウンロードはここまでの進み具合です。

コマンドレット実行開始から2時間ほど経過後、次の処理が走りました。


最終的に2時間10分ほどで、WindowsServerCoreのOSイメージをインストール完了。

Azureですと、ここまでがパッキングされたものが即利用可能となるわけですから、とても有用です。
でも、仕組みを知るには、自分で構築してみるのが一番でもあります。
Dockerのインストールは必須ではないみたいですが、別稿で確認結果をまとめる予定です。
以上、参考になれば幸いです。


