Update Rollup 5 for System Center 2016 Operations Manager
は、Windows Updateか手動インストールとなります。
それでもって、相変わらずSQLスクリプト適用しないといけないですね。。。
まだWindows Updateに出てきてくれないので、手動インストールでいきます。

Management server
Web console server role computers
Operations console role computers
Reporting(当方環境では、Management serverに入っているので、改めてのインストールです)
の順で入れますので、

からコンポーネントを選んでダウンロードします。

MSPファイルを取り出しておきます。
PoCは英語版でやっていますので、いったん英語版のみです。

最初は、Management serverです。
msiexecのコマンドラインが説明書きに無いですが、msiexec /update mspファイル名です。


数分かけてアップデートしました。というわけで、再起動。
Web console server role computers


これは十数秒ほどで完了。
Operations console role computers


これも十数秒ほどで完了。
Reporting

数秒で完了。
%SystemDrive%\Program Files\System Center 2016\Operations Manager\Server\SQL Script for Update Rollups
※当該環境では、
E:\Program Files\Microsoft System Center 2016\Operations Manager\Server\SQL Script for Update Rollups
配下に居ます。
の
Update_rollup_mom_db.sql
に対して
use OperationsManager;
go
冒頭に付加して実行します。

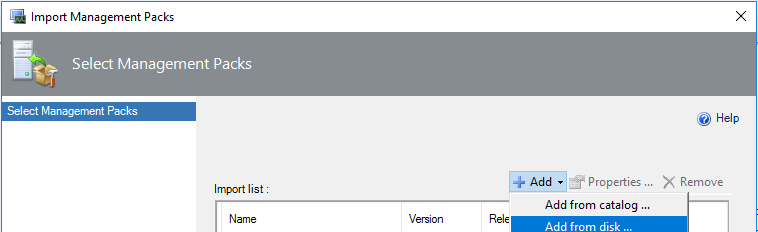
管理パックのアップデートです。
既定のインストールだと下記にあります。
%SystemDrive%\Program Files\System Center 2016\Operations Manager\Server\Management Packs for Update Rollups
※当該環境は、下記に居ます。
E:\Program Files\System Center 2016\Operations Manager\Server\Management Packs for Update Rollups

インポート進めます。


2018/04のタイムスタンプがあるものだけ選びます。


ここはインポートを強行します。

10分弱でインポート完了。

UNIX and Linux management packは、
System Center Management Pack for UNIX and Linux Operating Systems
から最新版をダウンロードします。


MSIファイルをインストールします。

インストール先をEドライブに変更してます。

インストール完了。


再びコンソールから管理パックをインポートしていきます。
※途中のステップは、先ほどと同様なので省略!
いわゆるLinuxのみ選択してます。


インポート完了。

Linuxのみで大体10分ほどです。
以上で、サーバー側のアップデートは完了です。
注)この後、エージェントのアップデートがありますので、忘れずに実施しましょう。
は、Windows Updateか手動インストールとなります。
それでもって、相変わらずSQLスクリプト適用しないといけないですね。。。
まだWindows Updateに出てきてくれないので、手動インストールでいきます。

Management server
Web console server role computers
Operations console role computers
Reporting(当方環境では、Management serverに入っているので、改めてのインストールです)
の順で入れますので、

からコンポーネントを選んでダウンロードします。

MSPファイルを取り出しておきます。
PoCは英語版でやっていますので、いったん英語版のみです。

最初は、Management serverです。
msiexecのコマンドラインが説明書きに無いですが、msiexec /update mspファイル名です。


数分かけてアップデートしました。というわけで、再起動。
Web console server role computers


これは十数秒ほどで完了。
Operations console role computers


これも十数秒ほどで完了。
Reporting

数秒で完了。
%SystemDrive%\Program Files\System Center 2016\Operations Manager\Server\SQL Script for Update Rollups
※当該環境では、
E:\Program Files\Microsoft System Center 2016\Operations Manager\Server\SQL Script for Update Rollups
配下に居ます。
の
Update_rollup_mom_db.sql
に対して
use OperationsManager;
go
冒頭に付加して実行します。

管理パックのアップデートです。
既定のインストールだと下記にあります。
%SystemDrive%\Program Files\System Center 2016\Operations Manager\Server\Management Packs for Update Rollups
※当該環境は、下記に居ます。
E:\Program Files\System Center 2016\Operations Manager\Server\Management Packs for Update Rollups

インポート進めます。


2018/04のタイムスタンプがあるものだけ選びます。


ここはインポートを強行します。

10分弱でインポート完了。

UNIX and Linux management packは、
System Center Management Pack for UNIX and Linux Operating Systems
から最新版をダウンロードします。


MSIファイルをインストールします。

インストール先をEドライブに変更してます。

インストール完了。


再びコンソールから管理パックをインポートしていきます。
※途中のステップは、先ほどと同様なので省略!
いわゆるLinuxのみ選択してます。


インポート完了。

Linuxのみで大体10分ほどです。
以上で、サーバー側のアップデートは完了です。
注)この後、エージェントのアップデートがありますので、忘れずに実施しましょう。
0 件のコメント:
コメントを投稿